Removing the body from the Chassis
(from Notes on Restoring Bricklin #887)
Originally written: 1994
Last updated: 12/16/04
©By: John T. Blair (WA4OHZ)
 1133 Chatmoss Dr., Va. Beach,
Va. 23464; (757) 495-8229 1133 Chatmoss Dr., Va. Beach,
Va. 23464; (757) 495-8229
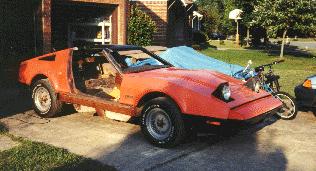 #887 is in pretty sad shape and going to need a
lot of tender loving care (spelled "WORK"). This I knew when I purchased her. I
was resigned to doing a complete body off (the chassis) restoration. When I brought her
home from Terry Tanner's shop my initial goal was to get the body-off the chassis and so
the work began. #887 is in pretty sad shape and going to need a
lot of tender loving care (spelled "WORK"). This I knew when I purchased her. I
was resigned to doing a complete body off (the chassis) restoration. When I brought her
home from Terry Tanner's shop my initial goal was to get the body-off the chassis and so
the work began.
As you will see, a restoration is a
sizable investment in time, so I don't advise this unless you are prepared to spend a
couple of years working on your car! If you are, then I hope this helps you. For those not
inclined to do this much work, you might want to continue reading if for no other reason
than to have an understanding of the work that goes into such a job.
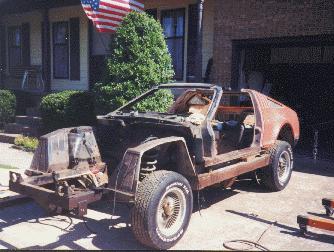
Before attempting to pull the body off the
chassis, it helps to remove as much as possible to reduce the weight if nothing else. Some
items must be removed, like the hood, hood extension, lower splash shield (air dam),
valances (lower side panels), front fenders, the gas tank, the seats and the interior
carpet and interior side panels. Other items such as the doors and the rear hatch are
removed to reduce the weight. (I also pulled the engine and transmission, don't know why
other than they had to come out sometime.) The speedometer cable will have to be uncoupled
as well as the shift linkage between the floor shifter and the transmission.
The steering column must be disconnected
from the steering box. This is accomplished by removing the 2 nuts at the flexible
coupling near the steering box. If you choose to remove the entire steering column from
the car (which I did) remove the steering wheel, the 4 bolts that hold the firewall
stiffener to the fire wall and the 2 bolts that hold the inner column support to the brake
pedal assembly. Carefully pull the entire steering column into the cockpit then either out
a door or through the rear hatch.
The brake lines that connect the master
cylinder to the proportioning valve must be disconnected from the master cylinder. These
two fittings can be a real pain to break loose. Start by applying plenty of WD-40 (or like
substance). Using a flare wrench, try to break the fittings loose. If the flare wrench
starts to spread open or the fittings have been rounded in the past, use a pair of vise
grips to grip the fittings. Have a small container ready to catch the brake fluid that is
stored in the master cylinder. The master cylinder and power booster can supposedly be
removed as a complete unit. However, I found it easier to remove the master cylinder from
the power boost then remove the booster.
There are several ways to go about
removing the power booster. The first is to remove the booster from its mounting bracket.
To do this, the cotter pin must be removed from the clevis pin that attaches the booster's
actuating rod to the "L" bracket that connects to the pedal rod. Then the 4 nuts
that hold the power booster to its mounting bracket can be removed and the booster lifted
off the car. I tried this method at first. However, I couldn't remove the cotter pin and
clevis pin.
Consequently, plan B. Remove the power
boost and mounting bracket as an assembly. Remove the bolt that connects the brake pedal
to the link rod. Next remove the 4 nuts on the engine side of the fire wall. Now the
entire unit, power boost, mounting bracket and bell crank can be removed from the car.
(Note: I've tried to remove the power booster on 2 Bricklins with the engine still in the
car. On both cars, I had a #$&& of a time trying to use method 1. I found that the
second method was the easier or as least less frustrating.)
The battery's negative (ground) cable must
be disconnected from the chassis. Its attaching point is on the rear chassis cross member.
The positive battery lead must be disconnected from the starting solenoid located on the
rear of the passengers side front fender well.
The emergency brake cable will have to be
disconnected from the emergency brake handle. The easiest way to do this is to slacken the
cable by loosening the parking brake equalizer adjusting rod and slipping the cable off
the equalizer.
There is a strap between the body and the
chassis located in each of the rear fender wells. I don't know what they are for, but they
will have to be disconnected.
Now for the fun part. There are 6 bolts
that attach the body to the chassis. Four of them are a real pain in the rear for several
reasons. First, there isn't a lot of room to get into these areas to work. Secondly, they
appear to be very susceptible to rusting. These bolts go through a metal sleeve, that
separates 2 rubber mounting pads, and into nuts which are welded to the chassis. Be sure
to apply large amounts of penetrating oil (WD-40) before trying to loosen them. The front
2 bolts are located in the support at the front of the doors. I tried to get a socket on a
universal joint into the access area and use an impact hammer. But I couldn't get things
lined up. Next I tried a 1/2" drive tommy bar I couldn't break the bolts loose. I had
to slide a 4 foot piece of pipe over the tommy bar to get enough leverage. I managed to
break the passenger side bolt in two. The drivers side bolt wouldn't budge. I ended up
tearing out the metal on the sill plate by jacking the body off the chassis. The 2 bolts
at the rear of the doors have the same inherent access problems. There is a round hole at
the bottom of the inner panel that allows access to these bolts. I managed to get one of
these bolts unscrewed, and I rung the other one off with the help of my friendly piece of
pipe.
The last 2 bolts are located in the trunk
area. Removing the trunk mat will reveal 4 large rubber plugs, 2 forward ones cover the
access holes to the rear shocks, and the rear most pair of plugs cover the access holes to
the mounting bolts. These were the only two I managed to get out.
With the bolts out, and everything else
disconnected, the body can be removed from the chassis. I started by holding a piece of
2x4 along the outer edge of the passenger's side door sill and jacking a floor jack up to
the wooden block. Then I carefully jacked the body up about 2", until I could fit a
piece of 2x4 between the sill plate and the chassis. I placed a piece of 2x4 between the
sill plate and the chassis near the fire wall and another piece of 2x4 behind the door
opening. As I raised the jack, I kept checking to see if anything on the body was hanging
up on the chassis.
As I said earlier, I couldn't budge the
front bolt. So I positioned the jack at the rear of the sill plate and jacked it up. When
I was able to get a piece of 2x4 between the body and chassis, I did so and let the body
down to rest on the wood. I moved the jack to the front of the sill plate and carefully
jacked it up. As I did, I tore the sill plate out around the bolt head. Another piece of
2x4 was inserted between the body and the chassis. The body was now off the chassis!!!
Well only 2" but technically off the chassis.
I jacked up both sides again an stood the
2x4s on their 4" side and placed another piece of 2x4, (on the 2" side) under
the other pieces. This now had the body about 6" off the chassis. This arrangement
was fairly stable, and I didn't have to worry about the body falling off the chassis as
the seat pan sits 8 plus inches down into the chassis. Several more looks around the car
to be sure that nothing was hanging or still connected.
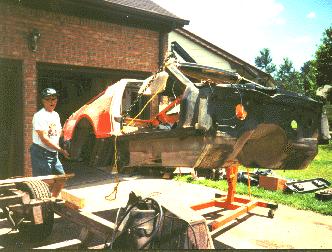
I had to get some working room around the
car before I could truly remove the body. So, I rolled the car from the garage into the
middle of the drive way. Now I could get a 2 ton engine crane all around the car. But what
could I used to attach to the body to lift with? A neighbor had a tow chain with the
"J" hooks at each end. I put one of the hooks into the lower hole on the metal
plate behind the door opening. I carefully lifted the chain up over the roof of the car
and back into the passengers compartment and into the similar hole. To remove the slack in
the chain, I bolted the loose chain out of the way. The engine crane was slid into the
side of the body and attached to the chain and slowly raised. The body actually came off
the chassis!
A couple of words of caution are due.
First, I don't know how much the body weighs, so be careful. Second, the body will be
heavier to the tail. However, you can lift it up to level it off while moving the body
around. Third, I don't know if the floor pan can support the weight of the body so you'll
kneed something to set the body on. I placed a jackstand at the four corners of the sill
plates and lowered the body onto them. Since the rear of the car was heavier, the rear
jackstand acted as a fulcrum and the body tilted down at the rear. I had to support the
rear of the body somehow. I took another jackstand and set under the middle of the trunk
area and placed some wood on the it to distribute the load. (The engine crane was still
attached to the chain holding most of the load. As the crane was lowered, the body settled
onto the stands and stayed. Its Miller time!
After a well deserved but too short break,
the chassis was pushed back into the garage. The engine crane was moved around to the
front of the car, and the body was lifted off the jackstands and pushed back into the
other side of the garage. The jackstands were positioned as before, under the body, and
the crane lowered. There the body sits, and sits, and waits. Before I tackle anything on
the body, I want to get the chassis and suspension rebuilt.
In closing let me say that there are
several metal reinforcement plates attached to the seat pan. There is one on both the
driver's and passengers side and on the front where the floor pans roll up to become the
firewall. There are 2 vertical panels (one on each side) of the transmission tunnel and a
large one that is actually 3 pieces welded together. This piece goes all the way across
the car and up into the transmission tunnel. The emergency brake assembly bolts to this
part. There is an H frame to support the trunk area and holds the gas tank. Finally there
are 2 brackets, one in each rear fender well, that attach a strap to the chassis and body.
These also have an ear on them that comes up into the interior of the car. I'm not sure
what attaches to them at this point (remember, my car had the interior gutted and is
missing the air/hydraulic door opening system). All of these panels are attached to the
fiberglass body by pop rivets and a glue. To remove these parts, the pop rivets must be
drilled out and the glue must be broken down. The glue can be broken down with heat..
Don't use an open flame as you might catch the fiberglass on fire, instead use a electric
heat gun to heat the parts.. As the metal parts are heated, a putty knife can be inserted
between the metal and fiberglass and the glue bond broken. On 887 I've had to fabricate
replacement parts for all these metal parts except the trunk's H. I had a local metal shop
make the parts including a new heat stove for the passenger side exhaust manifold for
about $200. When you are ready to reattach these parts to the fiberglass, you must use the
glue. The glue gives the assembly about 4 times the strength of just the pop rivets.
Discussing this with Terry, he informed me that they use a urethane bonding agent to glue
the metal to the fiberglass and that the pop rivets are basically used to hold the part in
place while the glue dries.
One last note. I've been advised not to
try to remove the rear quarter panels unless it is absolutely necessary.
That's enough for now. Hope you all will
get out and tinker on your "Bricks".
Enjoy your car,
John
Return to the Index of Tech. articles
|