Rust, Its not supposed to happen to a Bricklin
(from Notes on Restoring Bricklin #887)
Originally written: 1993
Last updated: 04/06/1998
©By: John T. Blair (WA4OHZ)
 1133 Chatmoss Dr., Va. Beach,
Va. 23464; (757) 495-8229 1133 Chatmoss Dr., Va. Beach,
Va. 23464; (757) 495-8229
It's true that the body
panels of the Bricklin were originally made of fiberglass with an acrylic covering. This
led to a "no maintenance" exterior and no rust, at least on the front fenders
and rear quarter panels. However, the bird cage, the plenum, the chassis, the suspension,
all the floor pan reinforcements and the front fender wells are made of steel. And guess
what? Steel rusts! For the answers to the obvious questions: Where does a Bricklin rust,
and how to fight rust read on.
Before I start with the
specifics that I found on 887, let me discuss rust fighting in general.
Fighting Rust:
Rust is the oxidation (adding
oxygen to) of a piece of metal. Therefore, it should be obvious, to stop rust the metal
must be prevented from oxidizing in the first place. How? Paint it! I hate bare metal, it
will rust. Every metal part on 887 will be painted. This includes things like the rear
quarter panel supports, the rear latch hinges, the brake and accelerator pedal assemblies,
and the brackets that hold the heating and air conditioning boxes to the firewall. On most
cars, we the owners, don't have a lot to say about what should be painted by the
manufacture so we have parts that aren't painted, so they rusted.
If a piece of metal has
already rusted, the first step in fighting rust during a restoration is to get the rust
off. There are several methods of rust removal. Probably the best and definitely the most
expensive is to have the part dipped in chemicals such as Ready Strip. However, there are
only a handful of companies around the country that do this. The second best method of
rust removal is sandblasting the part. This is a time consuming operation. For big jobs, I
send them out. I had 887's chassis blasted for $125. For smaller parts, you can blast them
yourself. For this you will need to purchase or build a sandblast cabinet (Harbor Freight
sells a nice plastic one for about $120) and a compressor (a 4hp 20 gal. tank at a minimum
- $400-700). If sandblasting is not an option, the third option is to use a wire brush. A
high speed (10,000 rpm) 4" grinder ($40-100) with a knotted wire wheel ($10-20) does
a great job. When using a wire brush (well wheel actually), this is my first choice. A
wire wheel in a 3/8" electric drill can also be used. For tight areas I use a 1"
cup brush with a 1/4" shaft chucked in a die grinder. Finally for heavy flaky rust on
heavy metal (like a chassis or suspension parts, beating the rust with a hammer works or
scraping it with a screw driver will due for starters. I guess I should mention the last
resort for badly rusted pieces. Re-fabricate or purchase a replacement part. However, this
can be expensive.
After the majority of the
rust has been removed, the metal and remaining rust should be treated with an acid to
change the living metal oxide into an inert metal sulfate. There are several product that
do the job, two of the most common are Ospho and DuPont's 5717S metal conditioner. These
products are available from most automotive paint supplier. This will also etch the metal
to give the primer better adhesion to the metal. With the rust killed, it's time to paint
the metal. There are a lot of possibilities here:
- a. For metal that will not be exposed to direct sunlight (ie., chassis and
suspension parts) there is a product called POR 15.
This stuff is marvelous and expensive ($30+ per quart)! It is impervious to petroleum
products, brake fluid, can be used as a gas tank sealer, used to seal small pin holes in
the metal. This paint dries rock hard and is chip and scratch resistant. If this paint is
to be used, read the fact sheet that should accompany the paint. Once the can is opened,
it must have a piece of plastic placed under the lid before trying to close the can. I've
found it is better to pour the contents from the can into several small (7 oz) glass jars.
Again place a piece of plastic between the lid and the jar. As the British Secret Agent
007 would say, This paint is "stirred not shaken". If the paint gets on the lid
and dries, the lid cannot be removed for the container. Consequently the plastic sheets
between the lids and the jar. When using this paint, I wear loose plastic gloves to keep
the paint off my hands. Once this paint gets on you and dries, you will wear it for
a while. If it is still wet, it can be wiped off using lacquer thinner or Acetone. It can
be applied either with a spay gun or brush. If using a brush, use the cheapest ones you
can find. When finished, I clean the brush with lacquer thinner or Acetone. This way I can
reuse the brush about three times. Warning: If you chose to
spray POR15, be sure to read the POR15 FAQ.
- b. A less expensive rust inhibiting paint such as Rust-oleum or DeRusto work
well. However, these paints can be affected by gasoline and brake fluid and are
susceptible to scratching.
- c. For exterior metal (usually the body) any of the automotive grade enamel or
lacquer primers and paints can be used. Be careful not to get these types paints on the
acrylic bodies of the Bricklin as the paint will melt the acrylic. If you are going to
paint over the acrylic, say to change the color (why would anyone in their right mind do
that? Because they are left handed or they didn't like those 5 fantastic colors!) a water
based sealer must be used first. This will act as a sealer for the acrylic so the paint
will not melt it.
Thus competes your first
course in rust fighting. So let us move on to several of the specific rust prone areas of
the Bricklin.
Doors:
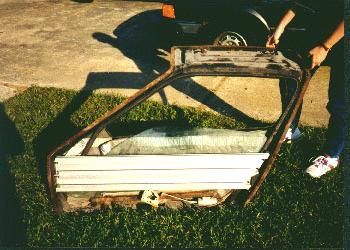 Undoubtedly the most
distinguishing feature of the car is the gullwing doors and if you look through the
Brickline technical articles, they are also one of the biggest problem areas. A lot has
been written about them but no one has mentioned that they are very susceptible to
rusting. If you haven't seen a door disassembled, they are made with a steel frame. The
outer skin is a fiberglass (and acrylic if original) panel that is glued to the steel
frame. The inside of the doors are covered by 2 separate panels. One for the lower part of
the door (from the window down) the other at the top of the door like a headliner. (There
are some design differences between the 74's and the 75's doors. One example is the lower
interior panel on the 74s are held in place using Phillips head sheet metal screws. While
the 75s lower interior panel is held on by a couple of strips very similar to VELCRO.) Undoubtedly the most
distinguishing feature of the car is the gullwing doors and if you look through the
Brickline technical articles, they are also one of the biggest problem areas. A lot has
been written about them but no one has mentioned that they are very susceptible to
rusting. If you haven't seen a door disassembled, they are made with a steel frame. The
outer skin is a fiberglass (and acrylic if original) panel that is glued to the steel
frame. The inside of the doors are covered by 2 separate panels. One for the lower part of
the door (from the window down) the other at the top of the door like a headliner. (There
are some design differences between the 74's and the 75's doors. One example is the lower
interior panel on the 74s are held in place using Phillips head sheet metal screws. While
the 75s lower interior panel is held on by a couple of strips very similar to VELCRO.)
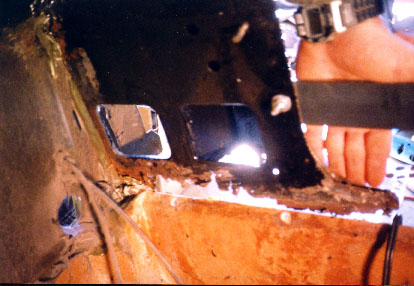
As water hits the windows,
it can run down between the window glass and the outer skin and collect on the bottom
ledge. There are supposed to be 2 drain holes on the outer edge of each door to let the
water drain out. However, these holes get be clogged by almost any kind of debris, from
leaves to spider webs. As dirt and trash collect on the inside of this ledge, they will
retain the water and make things worse. Therefore, keep an eye on these drains to ensure
that they are clear. If you haven't removed the lower panels from the doors and checked
them, it is about time to do so. The window crank handle must be unscrewed from the
regulator mechanism and removed. Then the lower panel can be removed from the door either
by removing the screws on 74s or pulling the "VELCRO" apart on 75s. Be careful
and don't just yank on these panels. Gently work them until the come off. Use a vacuum to
remove any dirt and trash from the lower edge of the door. Also examine the metal. If
there are holes in this ledge, they will have to be repaired. Depending on the amount of
damage, you may have to welded a new panel to the original one. If the ledge has some
pinholes in it, this can be fixed very simply. Either by painting the inside with the
POR-15 paint mentioned above, or with fiberglass patch. To make a fiberglass patch, lay
some fiberglass cloth and resin on the ledge from the inside of the door and let it
harden. (Note: small fiberglass repair kits are available at most automotive or hardware
stores.) If you need a lot of fiberglass cloth and/or resin, try a paint supply store and
buy in larger quantities.) Once the fiberglass has dried, sand the outside, bottom, of the
door ledge and apply some body filler. Sand the filler smooth, prime and paint.
Plenum:
The plenum is the area in
front on the dash board on the outside of the windshield with the 2 metal screens. This
area holds the windshield wiper motor and wiper mechanism. When the car was designed it
was known that during a rain storm this would fill with water, therefore, a small drip
tube was installed at center of the plenum behind the wiper motor to let the water drain.
Since this area is difficult to get to with the wiper motor and the engine in the car, the
drip tube quite often fills with debris and stops up. This drain should be checked, using
a pipe cleaner or piece of coat hanger, several times a year to ensure they are not
clogged up. In addition to the drip tube, there is a hole drilled at each side of the
plenum. As these holes plug up, the plenum fills with water and debris and eventually
rusts a hole in the plenum. If the drip tube behind the windshield wiper clogs and the
plenum rusts, water will leak into the interior of the car. If you have noticed the floor
carpets wet and couldn't figure out where the water was coming from, check the plenum.
To check the plenum, it
will be necessary to remove the windshield wiper assembly. Start be disconnecting the
wiring at the plug. Then there are several sheet metal screws that hold the windshield
wiper support bracket to the plenum that will have to be removed. Next the wiper motor
will have to be removed from the wiper mechanism. The motor is attached to this mechanism
with a little clip. Once the clip is removed, the wiper motor and bracket can be lifted
away from.
Let's assume that there
are no holes in the plenum yet. What should you do? Paint it! Remove the 2 screens, the
windshield wiper motor and the wiper mechanism. I am using POR-15 for this area but
Rust-oleum could be used. Remove as much of the dirt and rust as possible. Try using a
brush for most areas, then try a swab or a brush on a coat hanger. You can purchase a
spray system for getting into places like this from either J.C. Whitney or Eastwood for
about $35.
If there are holes and a
lot of rust in the plenum, you might have to cut it open and clean the metal with a wire
cup on an electric drill, and etch the metal with one of the metal conditioners mentioned
earlier. There are several ways of fixing the holes. If you have ready access to the
area, you can weld in a metal patch panel, or you can fiberglass in a piece of fiberglass
cloth over the holes, or you could fill the holes with some bondo. If the holes are very
small, painting with POR-15 will seal the holes - simply put some masking tape on
the back side of the holes before painting so the POR-15 doesn't drip through. Once the
repair are complete, weld the top of the plenum back in place and finish the work with
some body putty and paint to hide the welds.
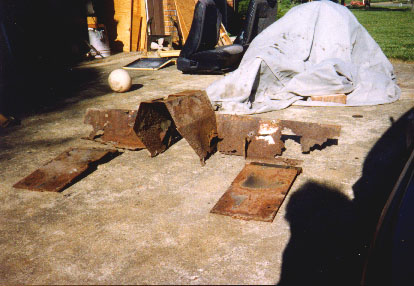
Front Fender Wells:
 On 887 the metal box at the front
lower edge of the front fender well was totally destroyed. Since 887 came from New York,
I'll assume that this is due to road salts used there. This box will have to be completely
re-fabricated and welded in place. On 887 the metal box at the front
lower edge of the front fender well was totally destroyed. Since 887 came from New York,
I'll assume that this is due to road salts used there. This box will have to be completely
re-fabricated and welded in place.
These boxes are open on
the outer most edge. This opening is hidden by the front fenders. These boxes should be
cleaned out and painted. To gain access to them, the front air dam or scoop and front
fender will have to be removed.
While the boxes are the
most vulnerable, the entire fender well will rust on both the top and bottom. The inside
of the fender well is the most prone due to rocks being kicked up by the tires. Here I
would suggest removing the rubber seal by drilling out the pop rivets that hold it in
place. Then wire brush the steel fenderwell and paint with POR-15 or similar product.
Sill plate:
With a door open, you can see
part of the sill plate. This piece of metal goes from the firewall back to the rear wheel
arch. When water runs out of the door or down the door jam, it lands on this plate.
Keeping it painted and waxed will help stop the rust on the top. The real problem is that
the underside of the plate is subjected to water kicked up by the tires. The under side of
the sill plate and the front part where the body and fender mounts are located are very
susceptible to rust. To really clean and paint the under side of the sill plate, the body
will have to be removed from the chassis - not a simple task. You can pull the side
valances and try to spray some paint on the bottom of the sill plate. Anything you can do
is better than nothing!
The water on the underside
of the sill plate also leads to problems with the body bolts. They have a tendency to rust
in place making it almost impossible to remove them. I would suggest that an attempt be
made to remove them, one at a time, and coat them with anti seize compound. If they don't
want to come loose easily, don't push it! Four of these body bolts attach through the sill
plate. There is 1 bolt in each "A" pillar (front support for the door) and 1
bolt in each of the "B" pillars. I broke 3 of these 4 bolts and had to rip the
sheet metal out of the sill plate at the 4th bolt to be able to remove the body on 887.
There are a couple of other body bolts in the trunk area. These are not as vulnerable to
rust, but I'd treat them also.
The chassis:
Thank goodness they made an
extremely strong chassis. I removed about 50 pounds of rust from the chassis. The majority
of the chassis and the transmission cross brace was made up of 3x4" box steel. The
next time your Bricklin is up on a lift or over a pit, try to get under the car and
examine the chassis for signs of rust.
There are two main problem areas for the chassis:
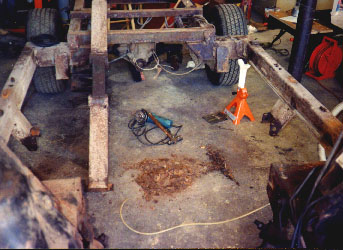
a. The transmission cross brace. It appears that this part was not treated at
all. After I removed the engine and body, I found that the entire transmission cross brace
was shot. I don't know what was holding the transmission in place because there sure
wasn't much metal left in the cross brace. I had to make a new one. The transmission
support can be removed with out pulling the body. However, it is quite a job. The problem
is the exhaust system. It runs right through the cross brace! You can cut the exhaust
pipes on either side of the brace, support the transmission on a jack or jackstands and
remove the transmission mount bolts. The transmission cross brace is held to the chassis
by 3 bolts on each side. Once these are removed, the cross brace can be removed and worked
on.

b. The other area is at the front and rear of the main for/aft sections. These
sections have the cross brace butt welded to them. Then the top, bottom, and ends have
plates welded over them for extra strength. Water gets trapped in these 4 corners and rust
out these corners. If the chassis is badly rusted, it might be necessary to pull the body
off the chassis to fix the problem.
A friend from work, Mark
Anderton, is currently restoring a Daimler with a lot of rust. Consequently, we've been
discussing ways of cleaning rust out of the chassis channels for many months. Each looking
for a better way to do the job. He finally came up with the best solution: He chucked a
cheap, plumbers snake in a 3/8" drill. Shoved the snake into the chassis rail and
turned on the drill. The ball end slammed all around in side the chassis rail knocking the
rust and scale off the inner walls. Slowly removing the snake cleans the length of the
rail. Mark also just found a metal shop that can fabricate most simple parts (no fenders
or hoods) and also sells metal. After he showed me the work they did fabricating some
chassis rails for his Daimler, I headed there to see if they had any of the box steel to
rebuild the transmission support and some 1/16" sheet metal. To my surprise they had
the box steel and sheet metal I needed. Several dollars lighter I left. It was a great
trip as they took my dad and I for a tour of their facilities and gave us a demonstration
of a spot welder and a plasma cutter.
To fix the rusted chassis
of 887 I have removed the body, the suspension and sent the chassis out to be sandblasted.
Then I've brushed on a coat of POR-15 paint on the outside of the chassis. With the
chassis upside down on jackstands I cut off these plates using both an air powered die
grinder with a cut off wheel and a 4" high speed grinder. Once the bottom end plates
were cut open, the rust was vacuumed out. After making new plates to cover the holes I've
cut open, I'll weld them on and turn the chassis back right side up, cut off the top
plates at the corners to replace them. Warning, You don't want to
remove all the bracing at one time on any corner, or you will have problems re-aligning
the chassis back up.
On several occasions I've
talked with Terry Tanner about what he does for "rust proofing" a car. He said
"he drills holes in the chassis and them sprays something in the chassis". I
asked the obvious question; How do you get anything into the middle of the chassis? He
showed me a undercoating spray kit he had acquired. I went through several tool catalogues
before I found it. As mentioned earlier, I've found this spray kit through J.C. Whitney
and Eastwood for about $35. I've used this spray gun to spray POR-15 paint inside all
pieces of the chassis. This should keep the rust from returning.
Floor Pan supports
There are several metal
supports that are glued, screwed, or pop riveted to the fiberglass floor pan for
reinforcement. Unless you know what you are looking for, you might not see them. You will
have to get under the car to inspect them. Here I would suggest that you take the car to a
muffler shop and ask if they could put the car up on their lift so you can inspect the
underside. If you decide to remove any of these plates, it will be necessary to drill out
the pop rivets and break down the glue. I found that a hot air gun (even an electric hair
drier can be used) will soften the glue enough to pry the panels off. DO NOT use a propane torch. While I'm from the old school;
"If a little is good, a lot is better", remember these plates are attached to
fiberglass. Too much heat and you could have a fire. Not to mention that there is usually
a lot of grease around which also burns easily.
At the front of both the
driver's and passenger's side there is a metal plate that wraps under the front edge.
These are held on with 4 pop rivets (located under the floor mats) and a lot of glue.
Removing these is relatively easy as nothing has to be removed from the car. Remove the
carpets and drill out the 4 pop rivets. Jack up the car and set it on heavy duty jack
stands. Slide under the car and try to heat the reinforcements with a heat gun and the pry
the pans off. I must admit, that I did this with the body off the car. This made getting
to the front easy. I wasn't limited in space since the engine and transmission were not in
the car.
The rear has 3 supports.
There is one on both driver's and passenger's side where the back of the seat pan rolls
horizontal to form the trunk deck. Again this can be removed easily. The pop rivets must
be drilled out and the glue broken down.
The largest one is the
lower support. This one goes across the passenger's side, then up across and down the
transmission tunnel and across the driver's side. This part is made of 3 pieces and welded
together. To remove this one, requires removing the transmission and emergency brake and
the part of the seat belt anchoring bolts that attaches to the transmission tunnel. The
seat belts are supposedly from a VW bug and use a T50 Torx head bolt. If your seat belt
bolt doesn't come loose easily, it will have to be cut out. I broke 2 T50 3/8" drive
Torx bits in less than 5 minutes trying to remove these bolts. (Note: So if you have to
purchase a T50 socket, be sure you get one with a life time warranty.) If you have to
remove the outer part of the seat belt, and the bolt is frozen, you will probably have to
remove the side valances to gain access to the nuts to cut them off.
After removing any or all
of these supports, the excess glue on the fiber glass can be sanded off. I used both a
6" orbital air sander and a 3" sanding disk chucked up in an air driven die
grinder and 36 grit sand paper. This is messy work. You will need to wear some type of
breathing mask, a disposable mask will work and eye protection, either goggles or a face
shield.
Trunk deck support:
There is one more metal
support on the Bricklin. This one supports the rear deck or trunk area. The outside of it
can be painted from under the car, but to remove it will require drilling out the pop
rivets and jacking the body off the chassis.
Misc.:
There are two brackets that
hold to the trunk deck and the back of the seat pan. These brackets can be seen from under
the rear fenders. They have a steel cable attaching them to the chassis, and have an ear
coming up into the cockpit. The nuts that are visible from under the car and are
welded onto the brackets. I spent hours trying to get the nuts off the bolts and couldn't
figure out why my impact wrench wouldn't budge them. To remove them, it will be necessary
to cut the metal cross brace that is in the cockpit between the B pillars and forms a
reinforcement for the trunk deck to seat pan transition. I measured inward about 3
1/2" form the interior side of the B pillar and marked a line on both sides of this
cross brace. Using a die grinder with a cutting disk chucked up, I carefully cut the cross
brace out, cleaned and painted it. Now I had access to the bolts. After removing the
bolts, I had to clean the glue from around the ears where they came up through the trunk
floor. (I don't know what these ears are for as the interior of my car was missing. I'll
have to check on another Brick' one of these days.) I have sandblasted these brackets and
painted them with POR-15.
Closing:
All metal parts should be
cleaned and painted. I will have to fabricate replacement parts for all of the floor pan
reinforcements for 887 as they all have rusted very badly. Being some what of a fanatic, I
have wire brushed the entire interior of the bird cage and as much of the outside as I can
and treated it with POR-15. I still have to clean and paint the plenum. I also have to get
some POR-15 inside the A and B pillars are repair some damage to the sill plate.
Based on my experiences
with 887, it is imperative that the chassis of the Bricklin be treated for rust. Remember,
bare metal rusts, so paint it. I hope this will help someone that is trying to restore
their Brick' and if nothing else, at least get you to have your Bricklin rust proofed.
Enclosed are drawings for
all the fiberglass reinforcement pieces on a Brick'.
Enjoy your car,
John
Return to the Index of Tech. articles
|