Getting Started and Removing the Front Panels
(from Notes on Restoring Bricklin #887)
Last updated: 12/17/04
©By: John T. Blair (WA4OHZ)
 1133 Chatmoss Dr., Va. Beach, Va. 23464;
(757) 495-8229 1133 Chatmoss Dr., Va. Beach, Va. 23464;
(757) 495-8229
If you decide to restore your
Bricklin you will want to have a garage, storage shelves, cardboard boxes, a camera,
plenty of paper and lots-of, lots-of WD40 and bandaids. On 887 almost every bolt was
frozen due to rust. I don't know how many cans of WD40 I used, but I still busted a lot of
knuckles. I finally got smart, and quite using my 1/2" drive socket set, and started
using my impact wrench - which saved many more knuckles. The camera is used to take
pictures, usually several rolls, during the restoration. This is for 2 reasons: first, you
want to have some before pictures so you can really appreciate the final result. Secondly,
the pictures will be used to refresh your poor memory on how and where things were
attached to the car. But don't trust everything to the camera. The paper is to allow you
to make many, many sketches of where things were placed. When I was restoring my 65
Morgan, I shot 2 rolls of film, then decided it was so much fun, I used the same 2 rolls
again. That effectively trashed 4 rolls of documentation. Several of the pictures were of
sentimental value, ie: my two boys first mechanical endeavor - helping me pull the engine
and transmission. Luckily, no real information was lost thanks to the 8 to 10 pages of
sketches and notes I'd taken. In restoring a Bricklin, the Bricklin Parts Manual
(available from the club) is also a must. While it doesn't cover everything such as a
vacuum diagram for the '75 cars or a wiring diagram it is worth the money.
To try to prevent losing
small pieces, try to leave assemblies intact until you are ready to restore them. As parts
are removed from the car, label them with masking tape and place small pieces, nuts and
bolts in zip lock bags with label (small pieces of paper Not real stick on labels, their
too expensive) indicating what they are and where they came from. The assemblies and the
ziplock bags should be placed in cardboard boxes and stored on shelves until the parts are
ready to be reworked. After a part or assembly has been cleaned and painted it should be
wrapped in newspaper, to keep it from getting scratched, and put back in a box. These
boxes will be stored until the part is ready to be reinstalled.
Now lets get to work
 The first and easiest part to remove is the
Hood. To remove the hood, you will have to unbolt the hood support rod which is attached
to the hood by 2 bolts. Prop the hood open by placing a 2x4 under the hood and wedging it
some place in the engine compartment. Undo the 4 bolts that attach the hood to each of the
hinges and carefully remove the hood. Find a nice safe place to store it as it will be a
while before the hood goes back on the car. The first and easiest part to remove is the
Hood. To remove the hood, you will have to unbolt the hood support rod which is attached
to the hood by 2 bolts. Prop the hood open by placing a 2x4 under the hood and wedging it
some place in the engine compartment. Undo the 4 bolts that attach the hood to each of the
hinges and carefully remove the hood. Find a nice safe place to store it as it will be a
while before the hood goes back on the car.
Removing the front fenders
 Removing the front fenders can be a real chore if the nuts
and bolts used to attach the fenders are rusted. While the easiest and most obvious place
to start is with the 2 large bolts on the top of the fenders under the hood, don't start
there. They will be used to hold the fender in place while working on all the other bolts.
The valance (the lower panel, below the black rubber molding) should be removed first.
Only the large section under the rear of the front fenders and the door need be removed.
The parts that are attached to the front of the front fenders and rear fenders can stay.
Start by pulling the black rubber molding off (it is only glued on) which will reveal some
pop rivets. Next there are a couple of bolts that hold the bottom of the valance to the
bottom of the chassis, that must be removed. Finally, drill out the pop rivets that hold
the valance to the chassis and the rear of the front fender. Removing the front fenders can be a real chore if the nuts
and bolts used to attach the fenders are rusted. While the easiest and most obvious place
to start is with the 2 large bolts on the top of the fenders under the hood, don't start
there. They will be used to hold the fender in place while working on all the other bolts.
The valance (the lower panel, below the black rubber molding) should be removed first.
Only the large section under the rear of the front fenders and the door need be removed.
The parts that are attached to the front of the front fenders and rear fenders can stay.
Start by pulling the black rubber molding off (it is only glued on) which will reveal some
pop rivets. Next there are a couple of bolts that hold the bottom of the valance to the
bottom of the chassis, that must be removed. Finally, drill out the pop rivets that hold
the valance to the chassis and the rear of the front fender.
The air dam below the
front bumper is attached to the bottom front of each of the fenders by 2 nuts and bolts.
Once these 4 nuts and bolts are removed the 2 additional bolts, that hold the back of the
air dam to the radiator support, can be removed. After all the bolts are removed, the air
dam should be set aside in a safe place.
With the dam removed you
can look up, from under the car, and see the 2 nuts and bolts that attach each side of the
hood extension to the fenders. These bolts should be removed now.
There is a metal bracket,
laminated to the inside of the fender, just in front of the wheel opening. This bracket
attaches to the chassis with 2 nuts and bolts. The nuts are difficult to reach as they are
behind the radiator and hood support bracing and unfortunately the nuts are not secured to
this bracing. For one person working alone, you can get to nuts by feeling your way around
from under the car, but it is a real bear. If you can get a helper, the nuts can be
reached by coming down from with the engine compartment. This is probably the better way,
however, at the time I did it, I couldn't find a helper. (Note: It might be worth looking
at a minor modification here, like using some kind of speed nut or tack welding the nuts
to the brace and using self centering bolts.
The rear of the fender is
attached to the body of the car with one bolt that is hidden. With the lower valance
removed, carefully and gently pull outward on the lower rear part of the fender by the
door opening. If the fender wiggles you are probably lucky. This is an indication that the
rear "L" bracket is broken. If the fender feels solid, you will have to go into
the cockpit to gain access to the hidden bolt. You will have to remove the covering on the
side panel under the dash, just in front of the door opening. There you will find an
access cover that is held in place by 1 sheet metal screw. After that screw is removed the
access cover can be removed. Now for the hard part. This bolt is a 14mm and usually rusted
in place. Try to get a 3/8" drive socket into the access hole and undo the bolt. If
the bolt cannot be remove, I suggest trying to cut the "L" brace with a hack saw
blade. (This "L" bracket can be repaired before reinstalling the fender.) Both
of the "L" brackets on my car were broken. Removal of the frozen bolt is like
trying to remove any bolt that is frozen. Liberally attack it with a penetrating oil like
CRC or WD40. You might be lucky and be able to get it out. The bolts on my car were in
pretty bad shape, I couldn't get a socket on the bolt on the drivers side and I sheared
the head off the bolt on the passenger's side. I guess I wasn't very lucky. I'll have to
drill out the bolt and replace the nut after I get the body off the chassis.
Finally, the two remaining
bolts that hold the fender to the firewall and radiator support can be removed. With the
fenders off, the hood extension can be removed. There are 3 bolts at the rear of the
extension holding it to the radiator support cross bar and two additional bolts holding
the front of the extension to two vertical support rods.
More stuff
Now that the front end
is off the car, you have better access to everything in the engine compartment. The bumper
can be removed at any time by removing the 4 bolts that hold each side of the bumper to
the rams. I chose to leave mine on for a while, as I have to push it in an out of the
garage and wanted something solid for the neighbors to push on.
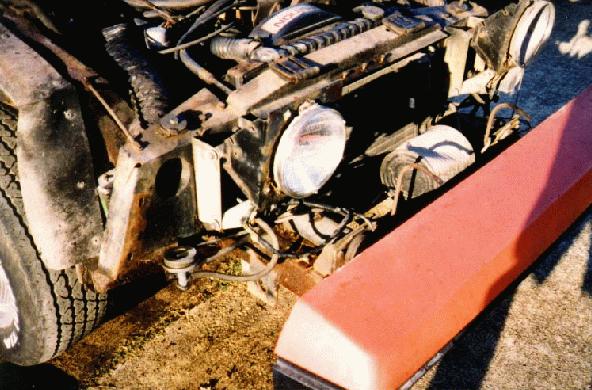 The upper
crossbar for the radiator core support, which holds the hood hinges, can be easily removed
at this point. There are 4 bolts on each side of the radiator core support, 2 on the top
just inside of the front fender mount and 2 on the front face just above the headlight
assembly. The upper
crossbar for the radiator core support, which holds the hood hinges, can be easily removed
at this point. There are 4 bolts on each side of the radiator core support, 2 on the top
just inside of the front fender mount and 2 on the front face just above the headlight
assembly.
The radiator is readily
accessible now. To remove it, you must remove the upper and lower radiator hoses, the air
conditioning condenser and the 2 metal transmission cooler lines from the bottom of the
radiator and the 4 bolts (2 on each side) that attach the radiator to the core support. Be
very careful removing the 2 transmission cooler lines. The nuts on my lines would not come
off even after several applications of WD40. Instead of risking damaging the radiator, I
chose to cut the lines. I can replace the lines when I reinstall the engine and
transmission in the chassis.
Before removing the main
part of the radiator core support, the headlight 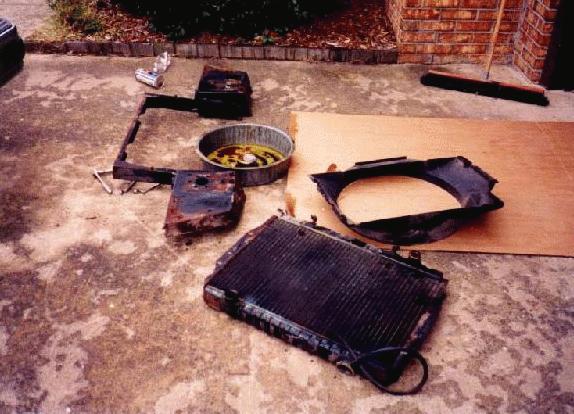 assembly and
the vacuum diaphragms should be removed. Start by removing the radiator overflow canister
and mounting bracket from the front of the drivers fender well and the flex hose that goes
to the air filter from the passengers fender well (75 cars only). Now remove the "top
hat" fastener on one side of each of the pins that hooks the actuator rods to the
headlight assemblies and remove the pins. Pull both the front and rear vacuum hoses to the
actuators. Then remove the 4 nuts from the front of the headlight assembly that hold the
actuators in place. The headlight assembly might need a little coaxing, gently hit it, to
break it free from the radiator core support. By fiddeling with the actuators, you can
pull them back towards the rear of the car and out of their mounting brackets. The two
headlight control valves located on the front lower part of the fender wells should also
be removed. assembly and
the vacuum diaphragms should be removed. Start by removing the radiator overflow canister
and mounting bracket from the front of the drivers fender well and the flex hose that goes
to the air filter from the passengers fender well (75 cars only). Now remove the "top
hat" fastener on one side of each of the pins that hooks the actuator rods to the
headlight assemblies and remove the pins. Pull both the front and rear vacuum hoses to the
actuators. Then remove the 4 nuts from the front of the headlight assembly that hold the
actuators in place. The headlight assembly might need a little coaxing, gently hit it, to
break it free from the radiator core support. By fiddeling with the actuators, you can
pull them back towards the rear of the car and out of their mounting brackets. The two
headlight control valves located on the front lower part of the fender wells should also
be removed.
Under each actuator is a
large bolt that attaches the remaining part of the core support to the chassis on a rubber
bushing. Undo these 2 bolts and the core support can be removed from the chassis.
In closing, I'd like to
take this opportunity to invite all of you to give me a call if you have any questions or
ever get to Virginia Beach, Va. I always like to talk to car people.
Enjoy your car,
John
Return to the Index of Tech. articles
| 