Reworking the Headlight Mechanisms
(from Notes on Restoring Bricklin #887)
Originally written: 1994
Last updated: 12/17/04
©By: John T. Blair (WA4OHZ)
 1133 Chatmoss Dr., Va. Beach, Va. 23464;
(757) 495-8229 1133 Chatmoss Dr., Va. Beach, Va. 23464;
(757) 495-8229
This article deals with the disassembly of
the headlight mechanism and how to rebuild it. But before I go into the mechanics of the
procedure, let me take a second to discuss some philosophy. "I think, therefore I
am"; or as the scarecrow said after receiving his diploma from the Wizard of OZ,
"The square of the Hypotenuse is equal to the sum of the squares of the other two
sides". Uh Oh, that's the wrong subject. My personal philosophy is that every piece
of metal should be painted for protection. I hate bare metal, even chrome. How does that
apply to the headlight mechanisms? Both the vacuum actuator and the headlight mechanism
appear to have been plated originally. However, most of the plating on 887' has been
destroyed and the mechanisms were pretty rusty. There are 2 options here, either have the
parts replated, or paint them. However, if you paint them, it is not original. Having been
brought up in the Antique Automobile Club of America environment, I tend to be in favor of
maintaining originality. But in some cases, like this, the cost of replating can be quite
expensive. In fact, for most plated parts, you can purchase a new part cheaper than you
can have the old one replated. I also restore my cars on a shoe string budget. Therefore,
I opted to paint the vacuum actuators and the headlight mechanisms and live with the 1 to
3 points I could lose in a concourse. With that said, lets get back to the business at
hand.
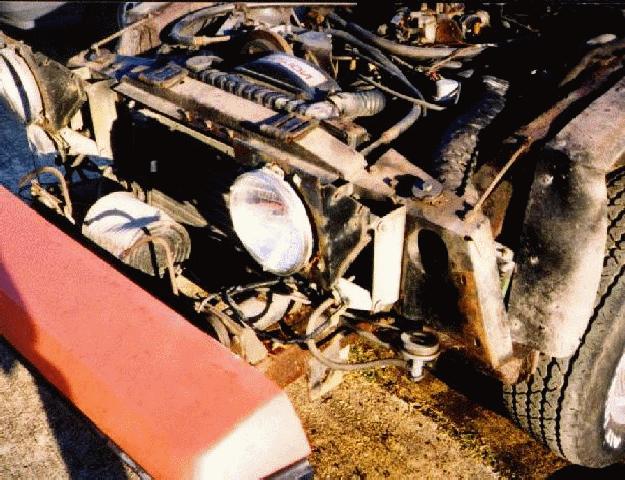
If you are not restoring the entire car,
but would like to rehabilitate the headlight mechanisms, you will have to remove either
the hood extension to gain access to the headlight area.
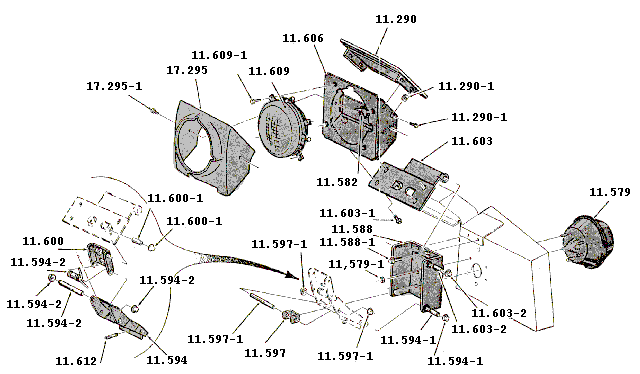
Start by removing the headlight cover
(#17.290), unscrew the 4 sheet metal screws that hold the cover to the headlight housing
assembly (#11.606). Next the bezel (#17.295) is removed by unscrewing the 2 sheet metal
screws that attach it to the headlight housing assembly. This reveals the headlight bucket
assembly which is removed by unplugging the connector from the wiring harness and
unscrewing the 4 machine screws (#11.609) that attach the bucket to the housing assembly.
 Now we
are down to the heart of the matter, the actual hinge assembly. The biggest headache in
working on the headlight mechanism is removing the "top hat" fasteners (#
11.603.2) from the rods, which is easy to say but difficult to do. I tried a couple of
methods, but didn't find an easy solution. First I used the tried and true approach -
prying them with a screwdriver; then I tried cutting an X in the top of the fasteners with
a Dremmel tool to help relieve their hold. If you opt for trying to cut these "top
hats" off, be careful as the rods are made of nylon. As I was cutting the X in the
tops, I noticed some black stuff coming out of the cut. It turned out to be the nylon. The
cutting wheel on the Dremmel tool was melting the nylon as it cut. Now we
are down to the heart of the matter, the actual hinge assembly. The biggest headache in
working on the headlight mechanism is removing the "top hat" fasteners (#
11.603.2) from the rods, which is easy to say but difficult to do. I tried a couple of
methods, but didn't find an easy solution. First I used the tried and true approach -
prying them with a screwdriver; then I tried cutting an X in the top of the fasteners with
a Dremmel tool to help relieve their hold. If you opt for trying to cut these "top
hats" off, be careful as the rods are made of nylon. As I was cutting the X in the
tops, I noticed some black stuff coming out of the cut. It turned out to be the nylon. The
cutting wheel on the Dremmel tool was melting the nylon as it cut.
 Remove
one of the "top hat" fasteners from the pin (#11.597.1) that attaches the vacuum
canister's actuator rod to the headlight assembly and remove the pin. The 2 bolts
(#11.588.1) at the top of the headlight mechanism cam be unscrewed. These bolts also
attach the upper cross bar to the lower, main part of the radiator core support. Next the
4 nuts (#11.579.1) are removed from the actuators studs. Now the entire hinged assembly
can be removed from the car. However, it might need a little coaxing, hit it with a
hammer!, to break it free from the radiator core support. (HINT: instead of actually
hitting the headlight mechanism with a hammer, hold a piece of wood against the headlight
mechanism and hit the other end of the wood with the hammer. The wood will prevent the
hammer from damaging the headlight assembly. Another option is to use a rubber mallet
instead of a hammer.) Remove
one of the "top hat" fasteners from the pin (#11.597.1) that attaches the vacuum
canister's actuator rod to the headlight assembly and remove the pin. The 2 bolts
(#11.588.1) at the top of the headlight mechanism cam be unscrewed. These bolts also
attach the upper cross bar to the lower, main part of the radiator core support. Next the
4 nuts (#11.579.1) are removed from the actuators studs. Now the entire hinged assembly
can be removed from the car. However, it might need a little coaxing, hit it with a
hammer!, to break it free from the radiator core support. (HINT: instead of actually
hitting the headlight mechanism with a hammer, hold a piece of wood against the headlight
mechanism and hit the other end of the wood with the hammer. The wood will prevent the
hammer from damaging the headlight assembly. Another option is to use a rubber mallet
instead of a hammer.)
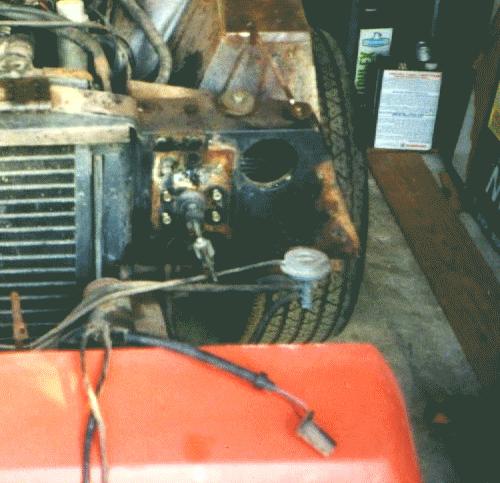 To
remove the vacuum actuators, you will have to remove the radiator overflow canister and
mounting bracket from the front of the driver side fender well and the flex hose that goes
to the air filter from the passengers fender well (on 75 cars only). Also, pull both, the
front and rear, vacuum hoses from the actuator. By fiddling with the actuators, you can
pull them back towards the rear of the car and out of their mounting brackets. This may
require a bit of patience and a few dirty words. To
remove the vacuum actuators, you will have to remove the radiator overflow canister and
mounting bracket from the front of the driver side fender well and the flex hose that goes
to the air filter from the passengers fender well (on 75 cars only). Also, pull both, the
front and rear, vacuum hoses from the actuator. By fiddling with the actuators, you can
pull them back towards the rear of the car and out of their mounting brackets. This may
require a bit of patience and a few dirty words.
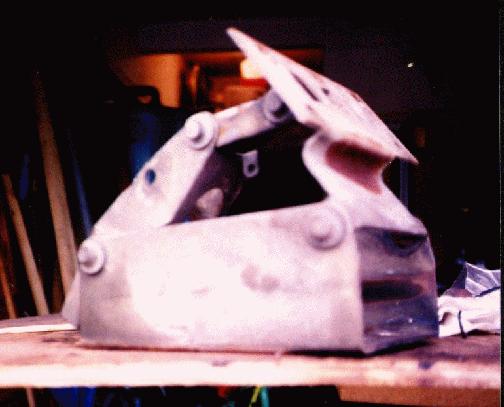
The headlight mechanism should be set on a
work bench for disassembly. In playing with them, I've found that there is an order to
disassembling them because of the heavy spring used to unfold the mechanism. Start by
removing the 4 outer "top hat" fasteners (2 on each side) from the headlight
base (# 11.588). Then push the 2 rods, at one end, inward until they come out of their
mounting holes. Do the same thing at the other end of the base. The main hinge portion
will now come out. As I disassembled the hinge section, I kept it clamped in a vice. Next
the hinge to the mounting bracket (# 11.603) can be undone from the hinge by removing the
attaching pin (# 11.600.1). This will leave the 2 sections (#11.600 & #11.594) that
form the hinge still pinned together. This pin also holds the spring in place. Remove the
fasteners from this rod (#11.597.1) and carefully drive it out with a drift. Be careful,
as the spring will try to fly away. With the mechanism totally apart you must make up your
mind about how you want to refinish the pieces.
To clean the parts I used wire wheels on
both a hand drill and a 4" high speed grinder (10,000 rpms). One word of caution, if
you haven't used one of the grinders before. Be sure to wear leather work gloves when
using the grinder. While trying to work these parts, the grinder got away from me on 2
occasions. The first time it nicked the thumb on my left hand. The next time it grazed the
back of my right hand just below the thumb. It took the injuries over 2 months to heal and
they are still tender 5 months after the incident. After the parts are clean, I coated
them with a metal conditioner to kill any remaining rust. I painted all the hinge parts
with black POR-15. The headlight bucket and the vacuum actuator were spray painted silver.
Once the paint had dried, the parts were
reassembled. Before starting to put things back together, the paint must be cleaned from
the pivot holes in all the pieces. The nylon rods should be cleaned to remove any burrs
created by the fasteners. If you have a drill with a 1/2" chuck, the rods can be
chucked in the drill and spun while you hold a piece of sandpaper to them. Otherwise, you
will have to lay the sandpaper flat on the work bench and manually rub the rods on the
paper. I also suggest tapering the edges of the rods just a little to help them through
the holes in the metal parts. The nylon rods are 3 different lengths: the 31/2" long
one is for the spring, the 2 3/4" are for attaching the headlight mounting bracket
(#11.603) to hinge (#11.600), and the remaining 4 - 1" rods attach the hinge assembly
to the base (#11.588). New top hat fasteners are readily available at the local hardware
store for about $.25 each. You will need 4 of the 3/8" fasteners and 28 of the
7/16" fasteners.
Reassembling the mechanism is straight
forward, proceed in the reverse order from disassembly. To lubricate the parts, I applied
a coat of white lithium grease to the parts as they were reassembled. Start by
reassembling the 2 pieces (#11.600 & 11.594) and the spring (#11.594.2). Then attach
the headlight mounting bracket (#11.603) and connect these parts to the base.
I found the easiest way to work with the
rods was to start by putting 1 fastener on each rod. This was accomplished by holding a
fastener on the end of a rod and pressing in on using a vice. Then the rods were inserted
through the holes from the inside of the headlight mechanism. Once the parts were
reassembled, the outer ends of the rods were exposed so I could used a 3" C clamp to
push the outer fasteners onto the rods. To start a fastener on the outer ends of the rods,
I placed the fixed end of the C clamp on the inner fastener. Then I used a 1/2"
socket to cover the top of the fastener to be installed. As the lead screw was then
tightened the fastener is pushed onto the rods. The socket was only used to make it easier
to hold the fasteners square on the rods.
If you are not going to put the parts back
on the car immediately, collapse the mechanism and tie it down with some heavy string.
Then wrap them in newspaper and put them in a box for storage.
One final thought. I'm thinking of making
a gasket, out of tar paper or rubber, to place between the headlight mechanism and the
radiator core support. This would help keep water from getting between these two pieces
and starting the parts rusting.
Enjoy your car,
John
Return to the Index of Tech. articles
| 