Removing the Dash Assembly
(from Notes on Restoring Bricklin #887)
Originally written: 1994
Last updated: 12/17/04
©By: John T. Blair (WA4OHZ)
 1133 Chatmoss Dr., Va. Beach, Va. 23464;
(757) 495-8229 1133 Chatmoss Dr., Va. Beach, Va. 23464;
(757) 495-8229
Is the pad on your dash board cracked? Has
you air conditioner had the modifications made to it? Do you need a new heater core or fan
motor? Are you restoring you car from the ground up? What do these questions have in
common? The dash board must come out. Like most jobs, if you haven't done it before, it
can be a real chore. I think it took me over 6 hours to get 887's out. This was because I
didn't know what I was doing or how to do it. However, I now have a lot better idea of how
things go. With 20x20 hind sight the job shouldn't take more than an hour.
 Have you ever tried to remove the headlight
switch? I worked on this for several hours and even enlisted the aid of a neighbor who is
big on muscle cars. We spent quite a bit of time playing with it before we went to his
manuals, but more on this later. Have you ever tried to remove the headlight
switch? I worked on this for several hours and even enlisted the aid of a neighbor who is
big on muscle cars. We spent quite a bit of time playing with it before we went to his
manuals, but more on this later.
Let me say that the previous owner had
installed some kind of anti theft devices and there is wire all over the place. There is
also a slide switch under the dash that appears to be going to the radio. I don't know how
much of this nightmare is stock, but I can see that I really have my hands full trying to
sort all this out.
Speaking of the wiring, I haven't been
able to find a wiring diagram for the Bricklins. Consequently, I'm working on trying to
draw one up as I go. But if anyone out there has a wiring diagram I would appreciate a
copy. (Note: The picture shows how the wiring is routed behind the instrument cluster, and
the wiring diagram shows how it is wired.)
One last item before I continue. Bricklin
didn't install a cigarette lighter as he felt that smoking in a car was unsafe. I'm not
going to argue his philosophy except to say that there are a lot of nice attachments for a
car that run off the cigarette lighter socket. Here, the last owner actually did something
partially right. He installed 2 cigarette lighters on the lower lip of the passengers side
of dash, where there is a lot of wasted space. However, he didn't solder the wires
together, he simply twisted together or wrapped around their terminals and taped. This is
unsatisfactory and unsafe. If any high current device were attached, like a Ham or CB
radio, it could have started an electrical fire. If you decide to make a modification like
this, be sure solder or crimp the wires. In addition, be sure to fuse the leads going to
the lighter socket.
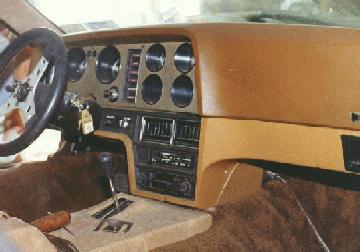
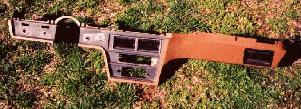
The dash board is composed of 3 pieces:
the padded or upper section, the plastic lower panel, and the instrument cluster. The
instrument cluster is the first and easiest section to remove. It is held in place by 12
sheet metal screws around the perimeter, the speedometer cable and one of the flex ducts
for the air-conditioner. I can't tell you exactly what is the easiest way to remove the
speedometer cable and the flex duct. All I know is that I did a lot of things wrong trying
to figure it out! On 887, the flex duct was held to the vent with duck tape. I would
suggest trying to come up from under the dash and removing the flex duct from the vent and
the speedometer cable from the speedometer. If you can't reach them, wait until the
instrument cluster has been freed from the dash. To do this, remove the 7 screws from the
face of the panel and the 5 screws from across the bottom of the panel. Now  the
instrument cluster can be pulled away from the rest of the dash just a little. At this
point you have access to the speedometer cable and can detached it from the speedometer.
This will allow some more movement of the cluster and if the flex duct hasn't been
removed, it should be possible to remove it now. As the instrument cluster is pulled
outward, you will notice 3 connectors that attach all the gages and their lights to the
wiring harness. Since these three plugs are of different sizes and shapes, it is not
necessary to label them. Once these are disconnected, the instrument cluster can be
removed from the car. the
instrument cluster can be pulled away from the rest of the dash just a little. At this
point you have access to the speedometer cable and can detached it from the speedometer.
This will allow some more movement of the cluster and if the flex duct hasn't been
removed, it should be possible to remove it now. As the instrument cluster is pulled
outward, you will notice 3 connectors that attach all the gages and their lights to the
wiring harness. Since these three plugs are of different sizes and shapes, it is not
necessary to label them. Once these are disconnected, the instrument cluster can be
removed from the car.
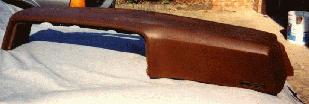 The upper (padded) section is the next to be
removed. It is attached to the lower part of the dash by several #10 studs and nuts
(requires a 3/8" wrench or socket). I've marked the studs and nuts with white paint
so they would stand out in the pictures.. You will have to crawl under the dash to remove
them. Where is Tom Thumb when you need him? There are 3 larger nuts (requires a 1/2"
socket), that attach the upper section to the firewall, which also accessed from under the
dash. Finally, there are 2 nuts and bolts which attach a bracket at the center of the dash
to the vertical supports from each side of the transmission tunnel. These bolts can be
accessed through the opening were the instrument cluster was located. The upper (padded) section is the next to be
removed. It is attached to the lower part of the dash by several #10 studs and nuts
(requires a 3/8" wrench or socket). I've marked the studs and nuts with white paint
so they would stand out in the pictures.. You will have to crawl under the dash to remove
them. Where is Tom Thumb when you need him? There are 3 larger nuts (requires a 1/2"
socket), that attach the upper section to the firewall, which also accessed from under the
dash. Finally, there are 2 nuts and bolts which attach a bracket at the center of the dash
to the vertical supports from each side of the transmission tunnel. These bolts can be
accessed through the opening were the instrument cluster was located.
 To remove the lower portion of the dash, it will
be necessary to remove all the knobs and switches from the dash. The knob for the
windshield wiper switch will simply pull off, this will leave a small clip on the shaft.
At the end nearest the dash the clip has a loop that surrounds the switch shaft. Place a
pair of needle nose pliers between the loop and the dash and gently pull towards the rear
of the car. This should allow the loop to move forward, stop binding on the shaft and let
the clip slide off the shaft. Finally, the nut attaching the switch to the dash can be
unscrewed. (Note: I would suggest that you place a rag over the chrome or plastic nuts
before gripping them with a pair of pliers. This will help prevent the chrome and plastic
from getting marred.) Before pulling the connectors from the switch, I labeled the
switches and the wires going to them with masking tape. This way I'll know what the
switches and wiring were for. Place all the switches and clamps in a plastic zip lock bag
to keep them from getting lost. To remove the lower portion of the dash, it will
be necessary to remove all the knobs and switches from the dash. The knob for the
windshield wiper switch will simply pull off, this will leave a small clip on the shaft.
At the end nearest the dash the clip has a loop that surrounds the switch shaft. Place a
pair of needle nose pliers between the loop and the dash and gently pull towards the rear
of the car. This should allow the loop to move forward, stop binding on the shaft and let
the clip slide off the shaft. Finally, the nut attaching the switch to the dash can be
unscrewed. (Note: I would suggest that you place a rag over the chrome or plastic nuts
before gripping them with a pair of pliers. This will help prevent the chrome and plastic
from getting marred.) Before pulling the connectors from the switch, I labeled the
switches and the wires going to them with masking tape. This way I'll know what the
switches and wiring were for. Place all the switches and clamps in a plastic zip lock bag
to keep them from getting lost.
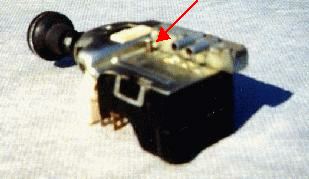 The headlight switch is a real jewel. I've played
with English sports cars most of my life and I've never seen a setup like this. However,
I've been told that this is typical GM. To remove the knob from the headlight switch, look
under the dash at the bottom of the switch. You will see a small pin with a spring wrapped
around it(See picture left, red arrow). Push this pin in and pull and twist the knob. The
knob and the entire shaft will come out. It takes a little fiddling with to get the thing
apart. Who would have guessed? Now that the knob is removed, the round black nut can be
unscrewed and the switch can be removed from the dash. The headlight switch is a real jewel. I've played
with English sports cars most of my life and I've never seen a setup like this. However,
I've been told that this is typical GM. To remove the knob from the headlight switch, look
under the dash at the bottom of the switch. You will see a small pin with a spring wrapped
around it(See picture left, red arrow). Push this pin in and pull and twist the knob. The
knob and the entire shaft will come out. It takes a little fiddling with to get the thing
apart. Who would have guessed? Now that the knob is removed, the round black nut can be
unscrewed and the switch can be removed from the dash.
The knobs for the heater controls do not
have to be removed as the entire control panel can be removed by removing the 4 - #10 nuts
(require a 3/8" wrench) from the back of this control panel. Once the nuts are
removed, the control panel can be pushed toward the front of the car and off the 4 studs.
The knobs for the radio will have to be
pulled off to reveal the nuts that actually hold the radio to the dash. Unscrew each of
these nuts. There are 2 courtesy lights, one under each side of the dash, that must be
removed. They are held in place with 1 phillips head screw each. Finally there is a stud
attached to the side wall of the body, on each side, that also holds the dash in place.
After removing the nuts from the studs, the lower section is ready to come out of the car.
Be very careful with this lower dash panel
as it is all one piece, very long and fragile. In effect, it is 3 pieces, one piece goes
from the steering column to the left side of the car (very short) and the other goes from
the steering column to the end of the passengers side (very long). These 2 pieces are
connected by a small "U" shaped piece that goes over the steering column. This
is where it will break. Be sure to support the entire length of this lower piece to
prevent it from breaking.
Now that the dash has been removed, you
have access to all the under dash items such as the heater and Air conditioning boxes.
Enjoy your car,
John
Rear view sketch of the Instrument
Cluster Panel
Rear view sketch of the Dash Instruments Wiring
Sketch of the Instrument Cluster Wiring
Return to the Index of Tech. articles
| 